|
|
|
AT-D868UV Firmware Updates
AT-D868UV Firmware Updating - original
|
|
AT-D868UV Firmware
Updating
General notes on firmware upgrading
Turn off the GPS and APRS
functions to prevent the radio from going into TX when connected to the
computer, as it may cause damage to the CPU or memory IC. Remember to save a copy of your
code plug before making an update.
Digital Contact List from RadioID.net
The RadioID.net website has stopped providing the Digital Contact List in the CSV file
format. The file format is now JSON.
To quickly convert a .json file to a .csv file you can use Digital ID List Converter.
1) Extract Digital ID List Converter.zip to a folder 2) Run
the JsonToCsv.exe
3) Click on Convert, it will allow you open a .json file 4)
Click on Save, it will save to a .csv file
The
following was added November 30, 2021
Firmware v1.40 & v2.40 have
been released. Firmware v1.40 is for radios with Hardware Version 1.0
and Firmware v2.40 is for radios with Hardware Version 1.1. If you use
the wrong firmware for updating, your radio will not work but is not
broken. After installing the correct firmware version, it should work
fine. To check which hardware version your radio uses, press MENU,
scroll to Device and enter that menu to find your Hardware Version.
CLICK HERE
to download both of these updates.
1. Resolves the issue that digital monitor doesn't work
2. Resolves the issue that signal strength bar will show full scale
when the signal disappears
This is the last firmware release for the
D868UV because its CPU is now full
The following was added
December 30, 2020
CPS
update v1.40 has been released. CLICK HERE
to download.
There was a problem with the previous CPS version (1.39) when exporting
.dcf files for use with Contact Manager. This CPS version 1.40
corrects that problem.
The following was added
August 7, 2020
Firmware update v2.39 has been released. CLICK HERE
to download.
This update addresses the problems that sometimes the radio will
transmit on the wrong TG and that loading the wrong code plug may cause
the radio to not power on. Anytone reminds you to Turn off the GPS and APRS functions to
prevent the radio from going into TX when connected to the computer, as
it may cause damage to the CPU or memory IC. Several guides are
included with information on how to perform updates, program the radio
and etc. Remember to save a copy of
your code plug before making this update.
The following was added April 16, 2020
Firmware update v2.37N has been released. CLICK HERE
to download.
This update addresses the problems that sometimes the radio will
transmit on the wrong TG and that loading the wrong code plug may cause
the radio to not power on. Anytone reminds you to Turn off the GPS and APRS functions to
prevent the radio from going into TX when connected to the computer, as
it may cause damage to the CPU or memory IC. Several guides are
included with information on how to perform updates, program the radio
and etc. Remember to save a copy of
your code plug before making this update.
The following was added October 29, 2019
Firmware update v2.36 has been
released. CLICK HERE
to download.
This update addresses the problems of audio drop-out and the radio
sticking on RX display when the signal drops. Anytone reminds you to Turn off the GPS and APRS functions to
prevent the radio from going into TX when connected to the computer, as
it may cause damage to the CPU or memory IC. Several guides are
included with information on how to perform updates, program the radio
and etc. Remember to save a copy of
your code plug before making this update.
The following was added July 6, 2019
Firmware update v2.35 has been
released. CLICK HERE
to download.
This update includes the latest Firmware
update which increases the digital contact list to 200,000. Anytone
reminds you to Turn off the GPS and
APRS functions to prevent the radio from going into TX when connected
to the computer, as it may cause damage to the CPU or memory IC.
Several guides are included with information on how to perform updates,
program the radio and etc. Remember
to save a copy of your code plug before making this update.
The following was added January 29, 2019
Firmware update v2.34 has been
released. CLICK HERE
to download.
This update includes the latest Firmware
update, Icon update and a new Windows Driver. There is no new programming
software with this update. Anytone adds this new warning with
this update: Turn off the GPS and
APRS functions to prevent the radio from going into TX when connected
to the computer, as it may cause damage to the CPU or memory IC.
Several guides are included with information on how to perform updates,
program the radio and etc. Remember
to save a copy of your code plug before making this update.
The following was added October 23, 2018
Firmware update v2.33 has been
released. CLICK HERE
to download.
This update includes the latest Firmware
update, Programming Software, Firmware Update Software, Windows Driver
and etc. It also includes an Icon
update. This Icon update appears to be the same version that was
released on August 28, so it may not need to be installed, if you are
up to date. If you have updated firmware before, you will not need all
the included files such as drivers, etc. Several guides are included
with information on how to perform updates, program the radio and etc. Remember to save a copy of your code plug
before making this update.
The following was added August 28, 2018
Firmware update v2.32 has been
released. CLICK HERE
to download.
This update includes the latest Firmware
update and Programming Software, Firmware Update Software, Windows
Driver and etc. It also includes an Icon
update. Icon updates are not released very often and their installation
is simple. If you have updated firmware before, you will not need all
the included files. I have included step by step guides with pictures,
that are more understandable than the factory versions. Also included
is a how-to on how to manually program the radio, written by KF4ZW. Remember to save a copy of your code plug
before making this update.
The following was added August 3, 2018
Firmware update v2.31 has been
released. CLICK HERE
to download.
This update includes the latest Firmware
update and Programming Software, Firmware Update Software, Windows
Driver and etc. If you have updated firmware before, you will not need
all the included files. Included is an updated factory Programming
Guide that includes information on using both Contact Manager and
Contact Wizzard software. For simply updating the firmware, I have
included a step by step guide with pictures, that may be more
understandable than the factory version. Also included is a how-to on
how to manually program the radio, written by KF4ZW. Remember to save a copy of your code plug
before making this update.
The following was added June 25, 2018
Firmware update v2.30 has been
released. CLICK HERE
to download.
This update includes the latest Firmware
update and Programming Software, Firmware Update Software, Windows
Driver and etc. If you have updated firmware before, you will not need
all the included files. Included is an updated factory Programming
Guide that includes information on using both Contact Manager and
Contact Wizzard software. For simply updating the firmware, I have
included a step by step guide with pictures, that may be more
understandable than the factory version. Also included is a how-to on
how to manually program the radio, written by KF4ZW. Remember to save a copy of your code plug
before making this update.
The following was added May 31, 2018
There has been a correction to the v2.29 firmware below. CLICK HERE
to download. This .zip file contains only the
three files (.spi, .cdd and .cdi) which are needed for the update.
These three files have the same names as the files provided in the May
28 update. I suggest that you simply replace the older files with these
new ones and perform the May 28 firmware update again, just like you
did before. This corrected update fixes an issue where the menu screen
would blink after the original May 28 update was applied.
The following was added May 28, 2018
Firmware update v2.29 has been
released. CLICK HERE
to download.
This update includes the latest Firmware
update and Programming Software, Firmware Update Software, Windows
Driver and etc. If you have updated firmware before, you will not need
all the included files. Included is an updated factory Programming
Guide that includes information on using both Contact Manager and
Contact Wizzard software. For simply updating the firmware, I have
included a step by step guide with pictures, that may be more
understandable than the factory version. Also included is a how-to on
how to manually program the radio, written by KF4ZW. Remember to save a copy of your code plug
before making this update.
The following was added April 14, 2018
Firmware update v2.27 has been
released. CLICK HERE
to download.
This update includes both a Firmware
update and an Icon update and
everything is included in this one file (Programming Software, Firmware
Update Software, Windows Driver and etc). If you have updated firmware
before, you will not need all the included files. Included is a factory
Programming Guide that includes information on using both Contact
Manager and Contact Wizzard software. I have included a step by step
guide with pictures, that I wrote, which may be more understandable
than the factory versions. Also included is a how-to on how to manually
program the radio, written by KF4ZW. Remember
to save a copy of your code plug before making this update.
The
following was added March 13, 2018
Firmware update v2.26 has been
released. CLICK HERE
to download.
Please note that everything is included in this one file. Programming
Software, Firmware Update Software, Windows Driver and etc. If you have
updated firmware before, you will not need all these files. Included in
the download is a factory Programming Guide that includes information
on using both Contact Manager and Contact Wizzard software.
For those not familiar with making firmware upgrades, I have included a
step by step guide with pictures that I wrote, that may be helpful for
first time users.
The
following was added March 6, 2018
Computer
Programming Software, CPS v1.25, has been
updated to correct its import/export functions. CLICK HERE to download this
update file. After installation, the program's version number remains
the same (v1.25). Remove your existing v1.25 and then install this
updated version.
The
following was added February 9, 2018
Firmware update v2.25 has been
released. CLICK HERE
to download. Please note that everything is
included in this one file. Programming Software, Firmware Update
Software, Windows Driver and etc. If you have updated firmware before,
you will not need all these files. Included in the download is a
factory Programming Guide that includes information on using both
Contact Manager and Contact Wizzard software.
For those not familiar with making firmware upgrades, I have included a
step by step guide with pictures that I wrote, that may be helpful for
first time users.
The
following was added February 1, 2018
Firmware update 2.24 adds radio
functions that require a new version of Computer Programming Software (CPS v1.24). CLICK HERE
to download.
REMEMBER TO HAVE A SAVED CODE PLUG BEFORE YOU DO THIS UPDATE
To update the firmware you will need the stand alone version of the
firmware update program FROM HERE,
if you do not already have it. (run this in administrative mode)
Firmware version 2.24 can be downloaded by CLICKING
HERE. This file also contains information on the updating
procedure and v2.21 to v2.24 changes.
If you have not already installed the required driver for updating your
radio, you can get it by CLICKING
HERE.
The following was added December 31, 2017
Firmware update 2.21 adds radio
functions that require a new version of Computer Programming Software (CPS v1.21). CLICK HERE
to download.
REMEMBER TO HAVE A SAVED CODE PLUG BEFORE YOU DO THIS UPDATE
To update the firmware you will need the stand alone version of the
firmware update program FROM HERE.
(run this program in administrative mode)
Firmware version 2.21 can be downloaded by CLICKING
HERE. This file also contains information on the updating
procedure and v2.20 to v2.21 changes.
The following was added December 26, 2017
Firmware update 2.20 adds radio
functions that require a new version of Computer Programming Software (CPS v1.20). CLICK HERE
to download.
Before updating your
firmware, use CPS v1.19 to read your radio and save the code plug.
To update the firmware you will need the stand alone version of the
firmware update program FROM HERE.
(run this program in administrative mode)
Firmware version 2.20 can be downloaded by CLICKING
HERE. This file also contains information on the updating
procedure and v2.19 to v2.20 changes. REMEMBER
TO HAVE A SAVED CODE PLUG BEFORE YOU DO THIS UPDATE
The following was added December 18, 2017
Base
Band 3258 IC Update
This update corrects a Time Slot issue when using a repeater. If you
are in QSO on time slot 1 and another station begins to use time slot 2,
your radio will mute as long as time slot 2 is being used. This update
corrects that situation so that both time slots can be used at the same
time.
Please follow the instructions carefully. CLICK HERE
to download a .zip file containing the update and instructions.
The following was added December 16, 2017
Firmware update 2.19 adds radio
functions that require a new version of Computer Programming Software (CPS v1.19). CLICK HERE
to download.
Before updating your
firmware, use CPS v1.18 to read your radio and save the code plug.
To update the firmware you will need the stand alone version of the
firmware update program FROM HERE.
(run this program in administrative mode)
Firmware version 2.19 can be downloaded by CLICKING
HERE. This file also contains information on the updating
procedure and v2.18 to v2.19 changes.
REMEMBER
TO HAVE A SAVED CODE PLUG BEFORE YOU DO THIS UPDATE
The following was added November
24, 2017
Firmware update 2.18 adds radio
functions that require a new version of Computer Programming Software (CPS v1.18).
This programming software also has the ability to update the radio's
firmware. Download and install this programming
software before continuing with these instructions. CLICK HERE
to download.
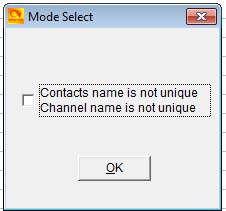
When you start this CPS, you may
see a small window open. This Mode
Select window was added at the request
of some California users. If this option is selected, you may use
identical names for multiple Contact names and Channel names.
You will also need to download the firmware file itself. CLICK HERE TO DOWNLOAD
If you have never used software to program this radio, you will need to
install a Virtual Driver before
you begin. CLICK HERE
to download this driver. After installation, and with your radio and
computer
connected via the programming cable, a virtual COM port will be
assigned each time the radio is powered on.
When the radio is off, the virtual COM port will not be visible in any
drop down list in the programming software.
General Information
All radios that we ship will be
updated with the latest firmware that is available at the time of
shipping.
It is a good habit to make sure the radio is turned OFF when connecting
the USB programming cable.
After a MCU (Main Control Unit) reset, setting the internal clock is
required. Also the radio's programming
returns to the factory default and you will need to reinstall your code
plug.
Clock Setting Procedure
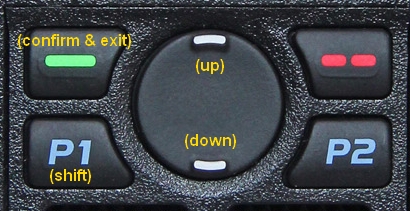 |
When setting the clock DO NOT
press the green button until all
settings are correct. The center button will change the setting up
or down, the P1 key will step through year, month, day, hour,
minute and second. The green button will confirm and exit the
clock setting function. |
To determine your current
Hardware and Firmware versions:
- Select MENU, SETTINGS, DEVICE INFO then scroll down
There is some misinformation and confusion on other sites about the
versions of this radio.
As of November 1, 2017 the Anytone factory provides this information:
Hardware V1.10 is latest
version and uses Firmware V2.xx
| Firmware Update Procedure |
.... if you
receive Run Time error 5 when using the built-in firmware
update tool, download the stand alone version FROM HERE. |
- Start the Anytone programming software D868UVE_1.18
- Connect the USB programming cable to the computer and to
the radio (with radio off)
- Turn on the radio. Click Set, then Set COM and choose the
virtual COM port.
With the radio turned off, you will see COM 1,2 & 3 in the dropdown
menu. With the
radio turned on, you will see the virtual COM port that has been
assigned to the radio.
- Click the Read From Radio icon (4th from the left). Choose
to read both Digital Contact
List and Other Data. Save the results, this is your code plug, you will
need it later.
- Turn the radio off
- To update the firmware, click Tool, then Firmware Upgrade.
This will open up the upgrade
program QX Code Update dpinst. Click the button Open Update File in the
software and
find the latest firmware update file. 868UV_1G_V2.18.spi
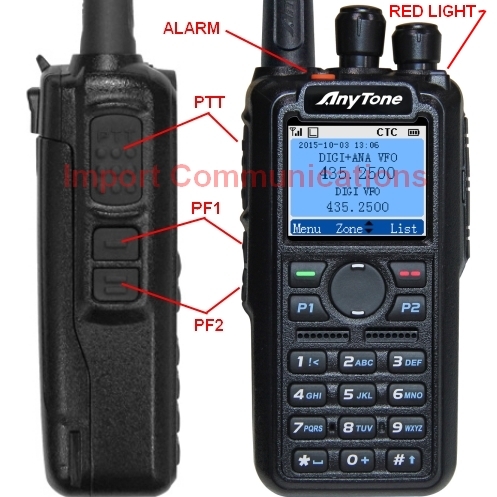
- Press and hold, both
the PTT button and the ALARM button, while powering on the radio.
The radio's red light will slowly blink.
- In the firmware program, put a check by Duplex, choose the
virtual COM port and click Write.
- After the writing process, the radio should reboot to a
normal opening screen. If it reboots to
a screen requiring a clock reset, the procedure may have failed. Repeat
steps 7 & 8. If it fails
again, contact your dealer.
- If you return to a normal opening screen in step 9, turn
off your radio. It is now time to
reset the MCU (Main Control Unit). With the radio off, press and hold
both the PTT & PF1
buttons while powering on the radio. The screen will ask if you want to
Initialize Radio. Use
the green button to confirm and the radio will then reboot to the clock
setting screen. Reset
the clock using the procedure shown above.
- The last step is to reload your code plug. Exit the
firmware updating window and open your
code plug in the v1.18 programming software. Choose the correct COM
port (radio must be
on) and click the Write To Radio icon (6th from the left). After the
write period, the radio
should reboot to your saved code plug. You can make any changes you
require and write
them to the radio. If you do make changes, remember to save the file
again.
Information about this Firmware
Update
If you open an old code plug in
the new v1.18 CPS (Computer Programming Software) you will need
to adjust 2 settings based on your requirements.
- In setting, Public - Optional Settings - Alert Tone -
Maximum Volume
The default setting is 1 when opening an old code plug. You can adjust
as required.
- In setting, Public - Optional Setting - Alert Tone - Volume
Change Prompt
Volume screen display can be set for On or Off
- Added a Man Down Delay time. Set this delay to prevent the
radio from sending the alarm
immediately when the radio is upended.
- Improve the Digital Monitor.
- Address the GPS positioning issue
- Modify АШSlot' to АШTime Slot' in the menu.
- Add a confirm for the MCU (Main Control Unit) Reset
- Add GPS on/off in the GPS info
- Delete the GPS positioning message
- Add Sub CH on/off with the option of long key press or
short key press in CPS
- In CPU АУ Public АУ Optional Setting АУ Other
Add an Analog call hold time. When the radio is in analog mode, if the
sub-channel
receives the call, you can transmit on the sub-channel when you set up
the Analog call hold time.
- Set up the auto backlight duration in CPS, when receive a
call, the back light will keep on for the
duration time when the signal is disappear.
- Add zone indication for the channels.
- Address the issue can not change scan list group in the
radio menu.
Programming Guide v1.18 by
Trygve Svard
CLICK HERE
to download
The following was added November 19, 2017
Firmware update 2.17 adds radio
functions that require a new version of programming software (v1.17).
This programming software also has the ability to update the radio's
firmware. Download and install
this programming software before continuing with these instructions. CLICK HERE
to download.
You will also need to download the firmware file itself. CLICK HERE TO DOWNLOAD
If you have never used software to program this radio, you will need to
install a Virtual Driver before
you begin. CLICK HERE
to download this driver. After installation, and with your radio and
computer
connected via the programming cable, a virtual COM port will be
assigned each time the radio is powered on.
When the radio is off, the virtual COM port will not be visible in any
drop down list in the programming software.
General Information
All radios that we ship will be
updated with the latest firmware that is available at the time of
shipping.
It is a good habit to make sure the radio is turned OFF when connecting
the USB programming cable.
After a MCU (Main Control Unit) reset, setting the internal clock is
required. Also the radio's programming
returns to the factory default and you will need to reinstall your code
plug.
Clock Setting Procedure
|
When setting the clock DO NOT
press the green button until all
settings are correct. The center button will change the setting up
or down, the P1 key will step through year, month, day, hour,
minute and second. The green button will confirm and exit the
clock setting function. |
To determine your current
Hardware and Firmware versions:
- Select MENU, SETTINGS, DEVICE INFO then scroll down
There is some misinformation and confusion on other sites about the
versions of this radio.
As of November 1, 2017 the Anytone factory provides this information:
Hardware V1.10 is latest version
and uses Firmware V2.xx
Firmware Update Procedure
- Start the Anytone programming software D868UVE_1.17
- Connect the USB programming cable to the computer and to
the radio (with radio off)
- Turn on the radio. Click Set, then Set COM and choose the
virtual COM port.
With the radio turned off, you will see COM 1,2 & 3 in the dropdown
menu. With the
radio turned on, you will see the virtual COM port that has been
assigned to the radio.
- Click the Read From Radio icon (4th from the left). Choose
to read both Digital Contact
List and Other Data. Save the results, this is your code plug, you will
need it later.
- Turn the radio off
- To update the firmware, click Tool, then Firmware Upgrade.
This will open up the upgrade
program QX Code Update dpinst. Click the button Open Update File in the
software and
find the latest firmware update file. Example: 868UV.spi
- Press and hold, both
the PTT button and the ALARM button, while powering on the radio.
The radio's red light will slowly blink.
- In the firmware program, put a check by Duplex, choose the
virtual COM port and click Write.
- After the writing process, the radio should reboot to a
normal opening screen. If it reboots to
a screen requiring a clock reset, the procedure may have failed. Repeat
steps 7 & 8. If it fails
again, contact your dealer.
- If you return to a normal opening screen in step 9, turn
off your radio. It is now time to
reset the MCU (Main Control Unit). With the radio off, press and hold
both the PTT & PF1
buttons while powering on the radio. The screen will show Initialize
Radio...... and will then
reboot to the clock setting screen. Reset the clock using the procedure
shown above.
- The last step is to reload your code plug. Exit the
firmware updating program and open your
code plug in the v1.17 programming software. Choose the correct COM
port (radio must be
on) and click the Write To Radio icon (6th from the left). After the
write period, the radio
should reboot to your saved code plug. You can make any changes you
require and write
them to the radio. If you do make changes, remember to save the file
again.
The following was added
November 18, 2017
To determine your current
Hardware and Firmware versions:
- Select MENU, SETTINGS, DEVICE INFO then scroll down
There is some misinformation and confusion on other sites about the
versions of this radio.
As of November 1, 2017 the Anytone factory provides this information:
Hardware V1.10 is latest version
and uses Firmware V2.xx (Hardware V1.00 is a older radio model
and uses Firmware V1.xx)
Driver Information:
Both the channel programming
software and the firmware updating software require a virtual COM port
driver to be installed.
CLICK HERE
to download this driver. After installation, and with your radio and
computer connected via the programming
cable, a virtual COM port will be
assigned each time the radio is powered on. When the radio is off, the
virtual COM port will
not be visible
in any drop down list in the programming software.
Firmware updating software:
The program used to update firmware is named QXCodePro_Update. CLICK HERE
to download this program.
Firmware Updating Instructions:
- Attach your radio to your computer with the USB programming
cable
- If you have previously programmed channels into your radio,
use the channel programming software to read
your radio and SAVE the
results. You will need to reinstall it later
- Start the firmware updating program QXCodePro_Update
- Press and hold, both
the PTT button and the ALARM button, while powering on the radio. The
radio's red light will blink
- Click the button Open
Update File in the software and find the latest firmware update file.
Example: 868UV.spi
- Choose the correct Com Port from the drop-down list in the
software
- Tick the Duplex box and set the Com Speed to 921600
- Click the Write
button to update the firmware
- Reboot (turn off/on) the radio when the update has finished
- The next step is to reset the Main Control Unit (MCU)
- With the radio turned off, press and hold both the PTT
button and the PF1 button while powering on the radio
- The display will show "MCU Reset" or "Initialize Radio"
- Do not turn off the radio, it restarts on its own
- You will need to reset the Date and Time after the radio
restarts
- Some firmware updates add new radio functions which may
require using newer versions of programming software
  Icon Updating
 (this step
is not always required)
Icon Updating is only necessary
if Anytone provides such an update. This would normally come as an
additional file
supplied with a firmware update. An example of the file name is D868_new_usb.spi. Do not use the
same .spi file
that was used to update your firmware as an Icon Update. The procedure
is as follows:
- Attach your radio to your computer with the USB programming
cable
- Press and hold, both
the PTT button and the PF2 button, while powering on the radio. The
radio's screen will display UPDATE MODE
- Start the firmware updating program QXCodePro_Update
- Click the button Open
Update File in the software and find the latest firmware update file.
Example: D868_new_usb.spi
- Choose the correct Com Port from the drop-down list in the
software
- Tick the Duplex box and set the Com Speed to 921600
- Click the Write
button to update the firmware
- After the update is finished, reboot your radio by powering
it off and back on again
- If you accidentally used the wrong .spi file during Icon
Updating, all is not lost. CLICK HERE
to download a .spi file that is up to date
as of November 11, 2017
Firmware Updates Available
|
|
|
Account Login
Mailing List Signup
|